Sunday, February 13, 2011

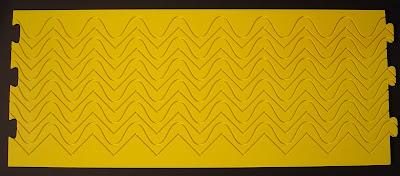
Circlelord Zig Zag-Waves Template

Center Section
The Zig Zag Giant Template set has 6 Zig Zag rows, and 6 Waves rows. It comes in King (3 sections- 130") and Queen (2 sections - 93")

On the left lower side of the template there is a series of holes to use with a Pin Plate for making all the patterns that you will see in the next chapter.
Pin holes numbered

Pin Plate Taped to Table

King Template fixed on Table with Pin Plate

Continue on to Mounting Instructions, Pattern Codes
and Quilt Samples

Circlelord Zig Zag Template Instructions


USE ARCHIVE MENU AT SIDE TO CHOOSE SECTION TO READ

http://www.loriclesquilting.com/

Toll Free 1-866-510-6060

CIRCLE LORD

ZIG ZAG TEMPLATE INSTRUCTIONS

TEMPLATE SET UP – Section 1
ZIG ZAG INSTRUCTIONS

Parts List
3 sections template for King,
2 sections for Queen,
Pin Plate,
bag of plastic blocks


Center section


Bargello quilted using waves ribbons
with quilt mounted sideways

ZIG ZAG TEMPLATE MOUNTING INSTRUCTIONS

The King Zig Zag template has 2 ends sections and one center section. Each end section has 20 holes which are used to move the template back and forth by 1/4 inch to make several patterns of Zig Zags and Waves. Zig Zag patterns are in Section 2 and Waves are in Section 3. After you have set the template up with the pin plate
taped under the left corner, you will lift and slide the template back and forth to make the pattern. Set up instructions are below.

When using ZZ lines, lay all three sections of the template on the table, so that the ZZ line is to the back of the table (closest to you). Center the template as required for the top being quilted - just as with a paper panto. When using the Waves, position it so that the waves line is at the back. Do not use rubber mat when using the pin plate. If you are just using the lines, or want to shift the template without the pin plate, you can put mat underneath for the entire length, for the greatest stability. Tape the corners to stop accidental shifting when not using the pin plate,
or the plastic edge blocks.


Template on table before using pin plate and plastic blocks


You will, usually, use the holes in the lower left corner of the template. Number the holes with a Sharpie marker, as seen above. The hole above the row is a registration hole used for advancing the fabric. This hole is not to be numbered.


After centering the template, and marking the holes, place the pin plate below the left corner of the template with the pin in hole 11 or 12. Place a piece of painters tape over the end of the pin plate sticking out. Lift the Template off the pin plate and tape it down on all four sides , as shown below.

Here is the tape and Pin plate ( Newest pin plates is 6 inches, as above)

Operating Instructions.

Use the template the same as a panto. Instead of following the lines with the laser light, you will follow the grooves with the stylus. When you com to an edge, and have to change rows, you can stop and cut the thread, or stitch up to the next row, using the area that will be under the binding, or trimmed off later.
Withe the Zig Zag line, slow down at the corners. With the Waves, follow the groove, keeping the wave motion in mind.
There are registration holes for both the Zig Zag and Waves lines. To quilt, follow the Visulizer patterns in Sections 2 and 3.
When crosshatching, do all the passes on one row before moving on to the next row.

ZIG ZAG TEMPLATE HOLDING INSTRUCTIONS

For some time, I have given simple instructions on how to use pieces of paint stir sticks and blue tape to hole the Circle Lord King templates on the longarm table. Here are some pictures and comments on this method. I, now, supply square plastic blocks with the template.
Here is a picture of the Zig Zag template on the back of the APQS Millenium using this method. The APQS machines are the most difficult to work with because there are no edge walls. It is best if you have a Patterngrid to help line up the template. When you have the template lined up, follow these instructions.

Place 4 blocks along the bottom of the template. First, put a piece of blue painter's tape across the center of the block. Then, put tape across the back, and press both down firmly, while making sure that the block and template are still squared to the table.

Plastic block and paint stir stick along edge of template

Tape across block

Block completely taped down

Top block taped down

Over all view of template on table with taped blocks

See Sections 2 and 3 for patterns

Circlelord Zig Zag Patterns


USE ARCHIVE MENU AT SIDE TO CHOOSE SECTION TO READ

http://www.loriclesquilting.com/

Call Toll Free 866-510-6060

CIRCLE LORD

ZIG ZAG TEMPLATE INSTRUCTIONS

ZIG ZAG PATTERNS – Section 2

Quilt below by Linda Mae Diny


Designs made using
The Zig Zag Visulizer developed by Gary Covington III


Email loricles@loriclesquilting for free Zig Zag Visulizer

CLICK ON PATTERN TO GET CLEAR PRINTABLE COPY

1

2

3

4

5

6

7

8

9

10

11

12

Circlelord Waves Patterns


USE ARCHIVES MENU AT SIDE TO CHOOSE SECTION TO READ


http://www.loriclesquilting.com/

Call Toll Free 866-510-6060

CIRCLE LORD

ZIG ZAG TEMPLATE INSTRUCTIONS

WAVES PATTERNS – Section 3

Quilt below by Linda Mae Diny


Designs made using
The Zig Zag Visulizer developed by Gary Covington III


Email loricles@loriclesquilting for free Zig Zag Visulizer

CLICK ON PATTERN TO GET CLEAR PRINTABLE COPY


1

2

3

4

5

6

7

8

9

10

11

12

13

14

15

Saturday, October 30, 2010

Zig Zag Quilts by Carmen

Making Waves on baby quilts - with pictures I had three of the same flannel baby panel to quilt for guild and decided to use the Circle Lord Zig Zag/Waves giant templates and quilt each with different waves. The quilts turned out cute and I had so much fun making waves that I decided to do one more guild baby quilt with Zig Zag. This template is incredibly versatile and so quick and easy to use and the number of different designs that can be made with it seems to be endless.


Waves Pattern


I was looking at quilt #3 and saw how different the quilt would look if the quilt were mounted sideways and quilted with this design. It almost looks like the design is spinning.

Quilt #3 turned sideways
Carmen used the Zig Zag Visulizer to design the pattern below

See the original posting with all the comments

Monday, October 5, 2009

Quilt of Valor -- For Wounded Warriors.
Pieced by the Quilting Divas (Bee) of Yorktown, Virginia
Quilted by Georgene Huggett, Poquoson, Virginia using the Circle Lord Zig Zag Template

02 Top

01 Top

08 Center Eagle

See more of Georgene's work on her Webshots

Copyright © 2009 Loricles Circle Lord. All Rights Reserved.


Copyright © 2009 Loricles Circle Lord. All Rights Reserved.